Integrations
Getting started with WooCommerce
Connect your WooCommerce store so HelpStack's AI and agents can answer order, tracking, and product questions, show a live chat widget on your storefront, and let you keep an eye on your inbox without leaving WordPress.
What you get#
| Order lookups | The AI answers "Where is my order?" and "What's the tracking number?" using live WooCommerce data, once the shopper proves the order is theirs |
| Product questions | Shoppers ask about products; the AI fetches the details straight from your catalog |
| Customer history | Agents see order count and spend history in the conversation sidebar |
| Storefront widget | An optional chat bubble on your shop so customers can ask questions without leaving |
| Support inside WordPress | See your recent HelpStack conversations right in your WordPress admin, with a link to open and reply to each one in HelpStack |
No technical knowledge required. You install one plugin and paste a code. The steps below take about 10 minutes. HelpStack only ever reads from your store; it never changes orders, products, or customers.
Step 1 — Install the HelpStack plugin#
The plugin requires WooCommerce to already be installed and active on your site.
-
In your WordPress admin, go to Plugins → Add New Plugin and search for "HelpStack".
-
Find HelpStack for WooCommerce in the results and click Install Now, then Activate.
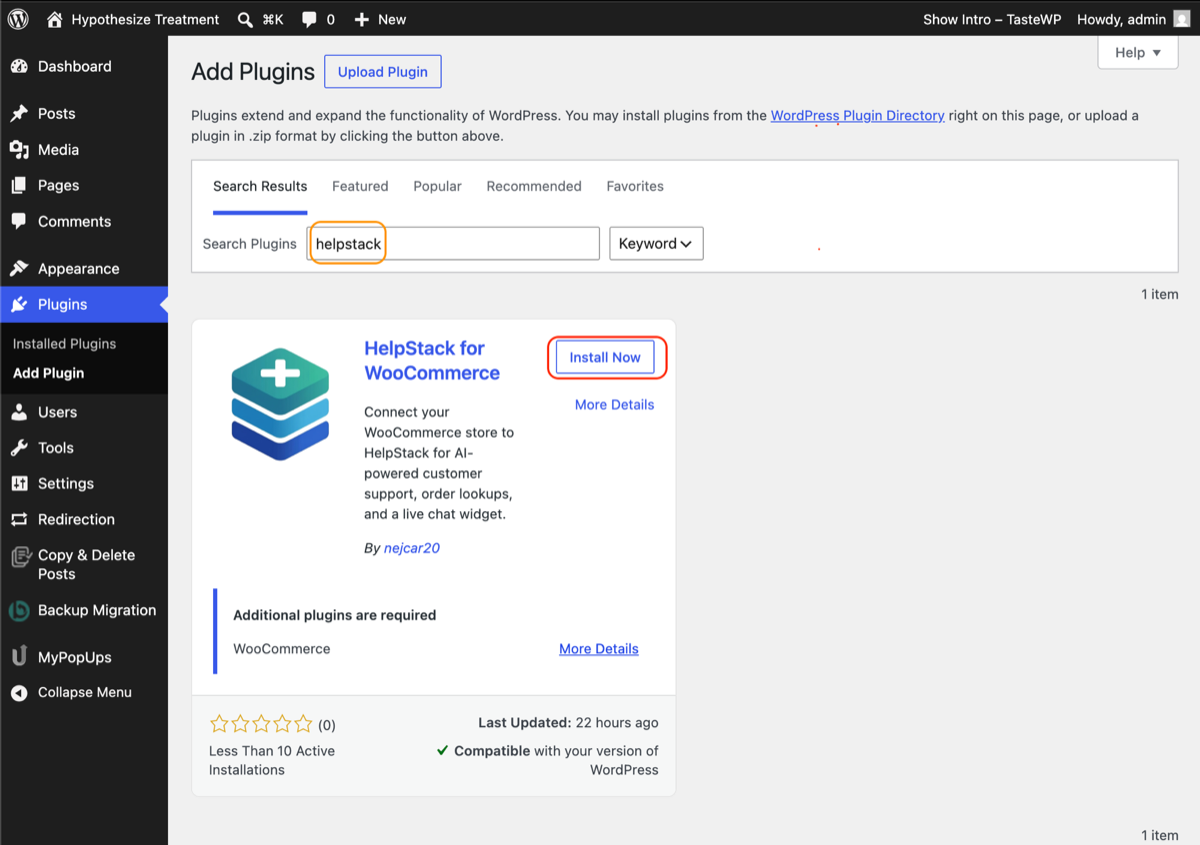
WordPress plugin directory search results for "helpstack," showing the HelpStack for WooCommerce plugin card, its WooCommerce requirement note, and the Install Now button Installing from a downloaded file instead? Get the plugin at helpstack.eu/integrations/woocommerce, then in your WordPress admin go to Plugins → Add New → Upload Plugin, choose the
.zipfile, and click Install Now, then Activate. -
After activation, a HelpStack menu appears under the WooCommerce menu.
Step 2 — Connect your store#
-
In your HelpStack dashboard, go to Settings → Integrations and find the WooCommerce card.
-
Click Connect WooCommerce. HelpStack shows a short pairing code, valid for about 15 minutes.
-
In your WordPress admin, open WooCommerce → HelpStack, paste the pairing code, and click Connect.
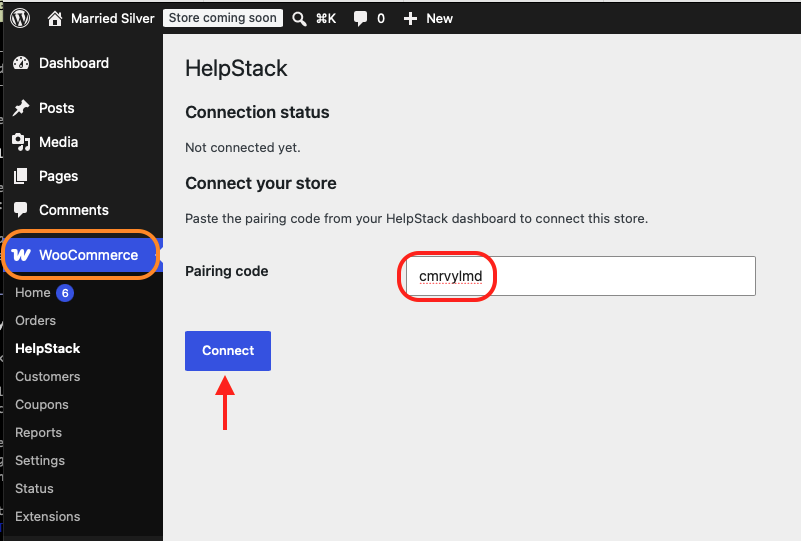
wp-admin WooCommerce → HelpStack screen with the pairing code field filled in and the Connect button -
The plugin creates a read-only access key for your store and hands it to HelpStack. Your HelpStack settings flip to a green Connected status showing your store URL.
If the code expires before you paste it, go back to Settings → Integrations in HelpStack and click Connect WooCommerce again to generate a fresh one.
That's it. From here on, agents see an Orders sidebar panel on every conversation, and the AI can answer order and product questions. The access is read-only: HelpStack can look things up but can never change anything in your store.
How order lookups protect your customers#
Anyone can open the chat bubble on your storefront, and order numbers usually run in sequence — 1001, 1002, 1003 — so an order number on its own is not proof of anything. HelpStack therefore treats it as half an answer:
- To look up a specific order, the AI needs the order number and the billing email the order was placed with. If the shopper has given only a number, the assistant asks for the email before it looks anything up.
- If the two don't match, the shopper is told no matching order was found. They are not told that the order exists but the email is wrong, because that alone would confirm somebody else's order is real.
- Customer history (order count, total spent) is only ever shown for the person in that conversation. The AI cannot be talked into pulling up somebody else's.
- "Find my orders by email" still works exactly as before: a shopper who gives their address gets their own orders back.
Your own team is unaffected. The Orders sidebar panel is for signed-in agents looking at your own store, so it keeps showing everything it always did.
Step 3 — Show the chat widget on your storefront (optional)#
This puts a chat bubble on your WooCommerce store so shoppers can ask questions without leaving. Skip it if you only want the AI to answer questions that arrive through other channels (email, Instagram, and so on).
- In WordPress, go to WooCommerce → HelpStack.
- Tick Enable HelpStack chat widget on my storefront and save.
The chat bubble appears on your store right away. Its appearance and which channel it uses are managed on the HelpStack side under Settings → Channels and Settings → Integrations, so you never touch theme code.
Step 4 — See your conversations inside WordPress (optional)#
- In your WordPress admin, open HelpStack Inbox in the left-hand menu (its own menu item, not nested under WooCommerce). An unread-count badge shows how many conversations need attention.
- You'll see a list of your most recent conversations: customer, last message preview, channel, status, and how long ago there was activity.
- Click a conversation, or its Open in HelpStack button, to open that conversation on helpstack.eu in a new tab.
This page is read-only inside WordPress — it's a quick way to see what's waiting for you. Reply to the conversation once it opens in HelpStack.
Troubleshooting#
| Problem | What to check |
|---|---|
| Chat widget not showing on storefront | Did you tick Enable HelpStack chat widget in WooCommerce → HelpStack and save? Is the store still Connected in HelpStack? |
| "Invalid or expired pairing code" | Pairing codes last 15 minutes. Generate a fresh one in HelpStack → Settings → Integrations → WooCommerce and paste it again quickly |
| AI can't find a customer's orders | Confirm the store shows Connected in HelpStack. The customer's email in the conversation must match the email on their WooCommerce order |
| AI says it can't find an order the shopper is certain exists | Looking up one order needs the order number and the email it was placed with, and the two have to match. Check the billing email on the order in WooCommerce; an order placed as a guest with no billing email cannot be verified and will not be read out |
| The HelpStack Inbox page says the store isn't connected, or asks you to reconnect | The stored connection is missing or no longer valid. Go to WooCommerce → HelpStack and reconnect using a fresh pairing code (Step 2) |
| Connect fails with "could not reach the store" | Your store must be reachable over HTTPS from the internet, and WooCommerce's REST API must be enabled (it is by default) |